Wake up to effortless curls: Why heatless overnight styling works
Heatless overnight curls are gentle, time-saving, and versatile. They create waves, loose curls, or defined ringlets without heat, which helps reduce breakage and frizz.
This short guide shows methods for different lengths and textures. You’ll learn how to pick the right approach, prep with products and a sleep-friendly setup, use braids and plaits, try twists, buns and headband techniques, and finish with morning maintenance and quick fixes.
Expect realistic results—soft, natural-looking curls that last a day or two. Read time: about five to seven minutes. Quick safety note: avoid tight styles or excessive tension while sleeping to protect your scalp and hair. Choose techniques that suit your routine and comfort.
Your texture (fine, medium, coarse) and how your hair naturally falls determine how a heatless method will translate into curls.
Fine hair: curls can look fragile and fall quickly. Use lighter products (volumizing mousse) and slightly looser sets for body rather than tight ringlets.
Medium hair: most techniques work well — you’ll get a balance of hold and softness with braids, twists, or rod sets.
Coarse hair: holds shape easily. Tighter techniques (small braids, buns, rods) give defined curls; looser styles create long-lasting waves.
Think of your natural pattern: If hair is already wavy, a gentle braid overnight will enhance waves; if it’s straight, you’ll need more tension or a rod-style method for definition.
Length-specific considerations
Match technique to length to avoid limp roots or over-bunched curls.
Short (chin-length and above): small buns, mini twists, or sock/rod wraps; expect bouncier, tighter curls.
Shoulder-length: braids, headband curls, or medium-sized buns deliver beachy waves to loose curls.
Long: multiple braids, wrapped buns, or long rod sets let curls relax into soft cascades; use sections to prevent bulk at the base.
Editor's Choice
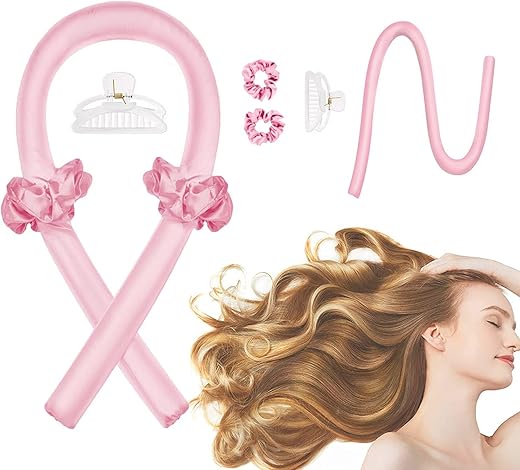
Kitsch Satin 34" Heatless Curling Rod Set
Top choice for frizz-free overnight curls
A 34″ satin heatless curling rod with two matching scrunchies for gentle, damage-free curls you can wear overnight. Easy to wrap and comfortable for day or night styling.
Porosity affects how hair absorbs and holds moisture. Do a quick strand test: high-porosity hair soaks up product and dries fast; low-porosity beads water and takes longer to accept moisture.
High porosity: lightly oil ends first, apply a moisturizing leave-in, and set while slightly damp for quicker definition.
Low porosity: mist with warm water or steam, use a lightweight cream or gel so product distributes evenly, and set when hair is more damp than dry.
Ideal starting point: hair should be about 60–80% dry — not dripping, not bone dry. This gives the best balance of shape and frizz control.
How tight should you set it?
Tension equals definition and hold.
For defined ringlets: higher tension, smaller sections, tighter braids/twists (best on medium–coarse hair).
For loose beach waves: low tension, larger sections, loose braids or buns.
For fine hair: avoid over-tightening — aim for medium tension to prevent small, limp coils.
Medium + long + want waves → 3–4 large braids or wrapped bun.
Coarse + short + want curls → small twists or rod set, tighter tension.
Low porosity + straight → steam or spritz, then headband or rods for hold.
Next: specific braid, twist and headband methods tailored to these matches.
2
Prep for success: products, tools and sleep setup
Wetness that wins: match dampness to method
How wet you go is one of the easiest mistakes to fix. In practice:
Braids and plaits: towel‑dried, slightly damp hair (think: cool to the touch, not dripping) gives smooth, even waves.
Twists and buns: a bit wetter helps set tighter coils — aim for hair that’s damp but not saturated.
Headband/rod methods: start slightly damp to nearly dry depending on porosity; low‑porosity hair benefits from a warmer mist first.
Think of it like baking: too much moisture and the “set” never forms; too little and the curl won’t hold.
Products that help — and what to skip
Lightweight, water‑based products are your friends. Try a small amount of leave‑in, then a styling aid for hold.
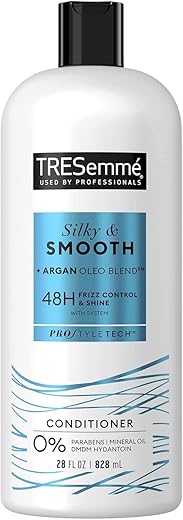
Leave‑ins: choose light sprays or creams (e.g., Ouai Leave‑In Conditioner, Bumble and bumble Hairdresser’s Invisible Oil Primer) to detangle and add slip.
Styling: volumizing mousse (TRESemmé Flawless Curls Mousse, DevaCurl-style foams) for body; light curl creams (Moroccanoil Curl Defining Cream) for texture.
Setting sprays: a light mist of flexible hairspray (L’Oréal Elnett or similar) after styling helps overnight hold.
Avoid heavy oils or thick butters before setting — coconut or dense shea products can weigh down fine hair and loosen curls overnight. If you want oil, use a tiny dab of argan oil on ends after styling.
Detangling & sectioning for even results
Start with gentle detangling using a wide‑tooth comb or aWetBrush, working from ends to roots. Section hair into workable pieces — 4–8 sections depending on length — so tension is even and curls match. Label a quick “map” in your mind: tighter sections for more definition, larger for beachy waves.
Accessories that won’t dent
Choose soft elastics, scrunchies, foam rollers, satin ribbons, and non‑metal bobby pins. Avoid tight rubber bands that crease hair. For headband methods, a soft, flexible fabric headband works best.
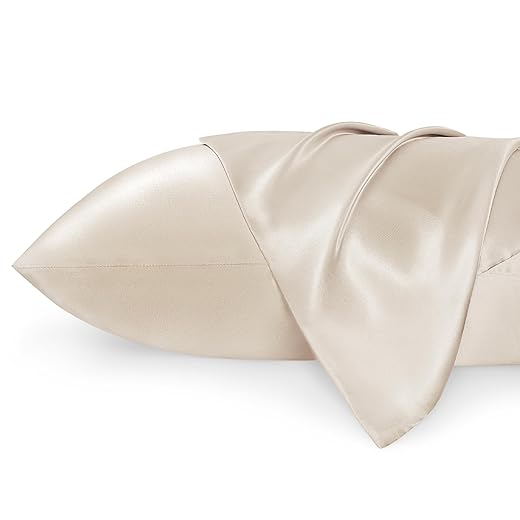
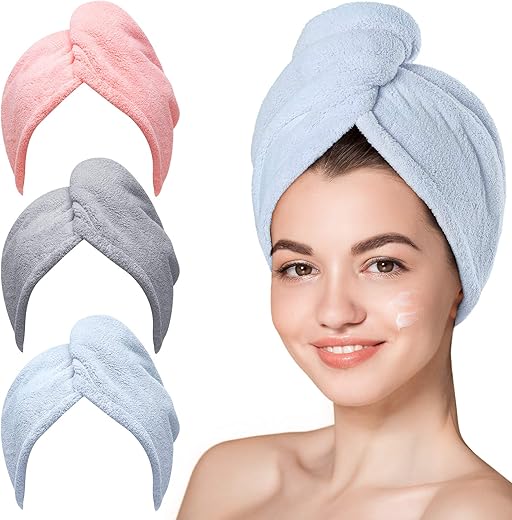
Best for Hair & Skin
Bedsure Satin Pillowcase Set Queen Size Pair
Reduces hair breakage and morning wrinkles
Satin pillowcases that minimize friction to help reduce hair breakage and morning creases on skin. Durable, vegan-friendly fabric with envelope closure keeps pillows in place for a better night’s sleep.
Swap cotton for satin/silk: pillowcases, bonnets or a loose satin wrap cut friction and frizz. Sleep on your back or in a slightly elevated position to avoid flattening curls; a loose pineapple (high, soft ponytail) works for many lengths but test it — short hair may need several small buns. A satin bonnet plus a satin pillowcase is the simplest combo that actually saves morning touch‑ups.
Next up: real-world braid, twist and headband recipes — step‑by‑step techniques you can do tonight.
3
Braids and plaits: easy styles for waves and loose curls
Multiple small braids — tighter, defined curls
For ringlet-like definition, do 8–16 small braids across the head.
How to: Section hair into 8–16 equal parts (more sections = tighter curls). Lightly mist each section, apply a small amount of lightweight mousse or curl cream, then braid snugly from roots to ends and secure with a soft elastic.
Tension: Firm, but not painful — you want the braid to hold overnight without scalp soreness.
Where to start: Begin at the nape and work upward so the part lines are tidy; small front braids give more curl near the face.
Layered/textured hair: For short layers, make smaller front braids and slightly looser back braids to avoid short pieces popping out.
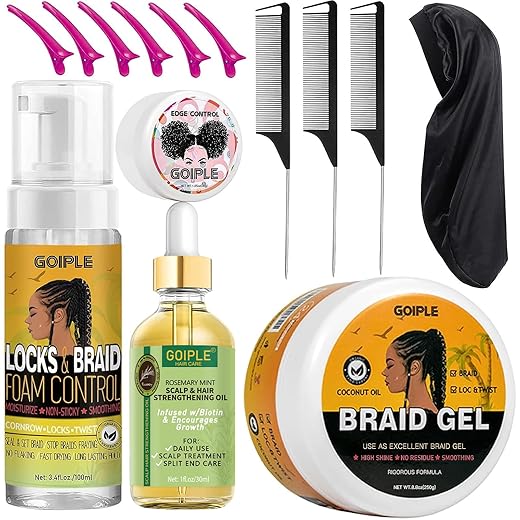
Professional Strength
Complete Braid & Edge Control Styling Kit
Extra hold for braids, locs, and edges
A 14-piece kit with braid mousse, gel, edge control, rosemary oil, combs, clips and a bonnet to lock in styles and reduce frizz. Formulated to hold braids, twists, and cornrows while nourishing hair and scalp.
For relaxed, beachy texture, use 2–6 larger braids.
How to: Divide hair into 2–6 sections (2–3 for long hair, 4–6 for shoulder‑length). Work with towel‑dried hair, add a light leave‑in and scrunch, then braid loosely and secure.
Tension: Loose is key — you want movement, not tight definition.
Where to start: Center part down the middle for symmetrical waves; off‑center for a lived‑in look.
Layered/textured hair: Add a few small face‑framing braids if layers fall through, or twist and pin short layers into the braid for smoother blending.
This method gives a consistent, polished S‑wave across the lengths.
How to: Make two medium braids (either tight or loose depending on desired S-shape). Wrap one braid across the top of your head and pin; repeat with the other in the opposite direction, tucking ends under. Secure with bobby pins or soft grips.
Tension & start: Moderate tension keeps the S-shape; start braiding behind the ears so the wrap sits naturally.
Best for: Medium to long hair; works beautifully on second‑day hair too.
Timing, drying and troubleshooting
Timing: 6–8 hours gives best set; 4 hours can work for looser waves. Very porous hair needs less time once nearly dry.
Drying tips: If hair is still wet in morning, use a cool blow‑dry briefly on low to lock the bend.
Troubleshooting:
Frizz: Use a tiny dab of oil on ends before unbraiding or sleep with a satin bonnet.
Uneven results: Check section sizes — match braid width left-to-right and re-braid any mismatched areas next time.
Day-after finishing & quick styling
Unbraid gently, finger‑comb or use a wide‑tooth comb to keep separation natural.
Mist lightly with a flexible hairspray (e.g., L’Oréal Elnett) then add a texturizing spray or a pea‑size of styling cream on ends for definition.
For more volume, flip your head and fluff at the roots with fingertips.
Next, we’ll explore twists, buns and headband methods for tighter coils and more defined ringlets.
4
Twists, buns and headband methods for defined curls and ringlets
These techniques deliver tighter, spiral‑style curls than braids. Small sections + consistent tension = uniform ringlets. Below are clear how‑tos, variations for length, and practical tips for protecting hair and securing without metal clips.
Two‑strand twists (classic ringlets)
How to: Section hair into 8–20 pieces (more = tighter coils). For each section, split into two equal halves, apply a pea‑size of curl cream or mousse, then twist the two strands around each other away from your face until you reach the ends. Coil the twist into a small knot at the base and secure with a satin scrunchie or loop pin.
Direction & diameter: Twist away from the face; use thinner sections for pencil‑thin ringlets, thicker for bouncy spirals.
Short hair: Use smaller sections and stop twisting before very short layers—tuck and pin loose ends under the base.
Rope twists (for a smoother spiral)
How to: Divide into 6–12 sections. Twist each half in the same direction (clockwise), then wrap the two twisted halves around each other counterclockwise. Secure with a soft elastic.
Why it works: Pre‑twisting each half creates a cleaner, more defined corkscrew.
Combine: Twist crown sections and braid or pin ends into a low bun so layered ends blend.
Great Value
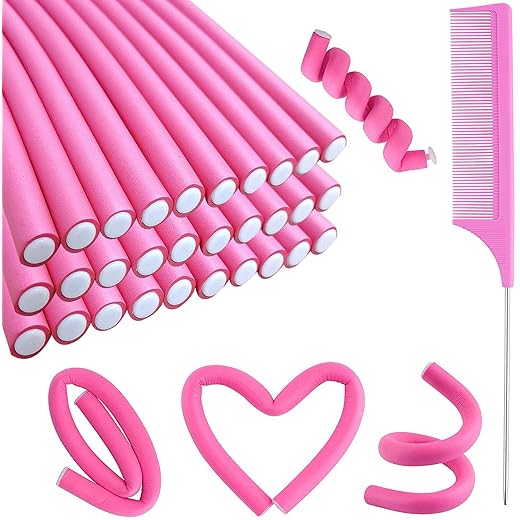
30-Pack Flexi Rods Foam Curlers Set
No-heat rollers for long or short hair
A set of 30 soft, flexible foam flexi rods and a rat-tail comb for creating heatless curls and waves. Easy to roll and secure by bending the ends, suitable for wet or dry hair.
How to: Use a rolled sock or tube (short for tighter curls, long for larger spirals). Pull slightly damp, product‑treated hair through the sock, then roll the sock down toward the nape so hair wraps around it; tie ends in a secure knot or tuck under a scrunchie.
Variations: For long hair, wrap in multiple passes for length balance. For short hair, use a thinner tube or smaller sock to avoid bunching.
Protect ends: Thread the very tips through a small satin square or wrap in tissue before rolling to reduce friction.
How to: Place a stretchy headband around your forehead. Take 1–2 inch vertical sections, wrap hair around the band away from your face (over and under) until the ends are tucked inside the band. Repeat across the head.
Best for: Medium to long hair; this creates consistent curls around the face.
Tip: Secure with satin scrunchies at the back if needed, avoid metal clips.
Soft foam & flexible rollers — consistency without damage
Use foam rods or flexi‑rods for predictable ringlet size. Wrap hair smoothly, secure the flexible ends without clips, and place on a satin pillowcase to reduce pressure points.
Safety tips: Don’t overtighten (you’ll see defined coil but no scalp pain), avoid metal clamps, and protect fragile ends with a light oil or split‑end sealant.
Next, we’ll move into morning finish, maintenance and quick fixes to ensure your curls last all day.
5
Morning finish, maintenance and quick fixes
Unwrap gently
Start with clean, calm hands. Undo twists, buns or rods slowly from the ends toward the roots to avoid tugging fragile new curls. If something feels stuck, mist the section lightly with water or leave‑in spray and wait 30–60 seconds — the moisture relaxes product cast and eases separation.
Separate and refine
Decide your finish: soft, voluminous waves, or defined ringlets? Use finger‑tousling for texture and volume; use a wide‑tooth comb or your fingers only at the ends if you want smoother curls. Avoid fine‑tooth combs and brushes unless you’re aiming for a uniform blowout.
Finger‑tousling: cup each curl, gently pull it apart along the curve to increase body without creating frizz.
Combing: for looser waves, run a wide‑tooth comb down mid‑shaft to ends only.
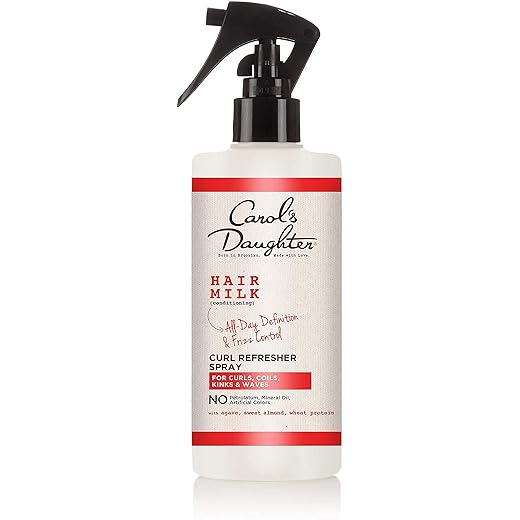
Must-Have
Hair Milk Curl Refresher Spray 10oz
Rehydrates and redefines curls instantly
A lightweight mist that remoisturizes, redefines, and reduces frizz for curls, coils, and waves without weighing hair down. Enriched with agave, sweet almond, and wheat protein to add softness and shine.
Curl refresher sprays for instant definition and moisture (spritz, scrunch, air dry 5–10 minutes).
Light serums for shine and frizz control (Moroccanoil Treatment Light or a jojoba oil blend — one pea‑size amount).
Salt or wave sprays for texture; avoid alcohol‑heavy formulas if your hair is dry.
Quick fixes for common problems
Flat roots: lift at the crown with dry shampoo (Batiste) and gently backcomb a small section at the root, then smooth the top layer.
Brassy frizz or dullness: a cool water rinse over the head restores shine; a purple shampoo can help weekly for blonde tones.
Limp curls: lightly mist problem sections, re‑twist or re‑pin for 10–20 minutes; for stubborn spots, use a curling wand on low heat for 5–10 seconds per curl as spot correction only.
Short maintenance plan & hair health
Refresh schedule: refresh curls every 1–3 days depending on activity and hair type; full reset (wash + restyle) every 5–7 days.
Sleeping to preserve curls: pineapple loose curls on top of your head, sleep on a satin pillowcase, or re‑wrap with a satin scarf.
Protect hair health: rotate heatless techniques, avoid daily tight styling, use deep‑conditioning once weekly, and trim ends every 8–12 weeks to prevent split‑end travel.
These morning steps will keep your overnight effort looking intentional and lasting — next, let’s wrap up with simple long‑term tips to rely on.
Wake up to your best hair: simple heatless curls you can trust
Overnight, heatless methods protect your hair while delivering real, wearable curls. Match techniques to your texture, choose gentle tension, and rely on the prepping steps so moisture, products, and sleep setup work with—not against—your style. Small adjustments (braid size, twist tightness, or product amount) change the outcome without heat damage.
Use the morning routine to refine shape and volume, protect curls with a light serum or spray, and refresh between washes with gentle touch-ups. Try one method tonight, note results, then refine — your best wake-up waves are waiting.
Hello! I’m Ava Wilson, a passionate advocate for healthy, beautiful hair. With years of experience in the hairstyling industry and a deep-rooted love for all things hair, I’ve made it my mission to share valuable insights and expert tips on nurturing and styling locks.
Love the idea of heatless styling, but worried about costs — kits, pillowcases, multiple tool sets add up. Are there cheap DIY options that still work? I don’t mind a bit of trial-and-error, just don’t want to spend $100+ right away.
Totally get that. DIY options: use an old soft tee as a headband or make DIY silk scrunchies (less friction than cotton). Braids and twists need minimal product. Bedsure pillowcases are nice but you can try a silk scarf first. The only pricier buys I’d recommend if you want convenience are a decent rod kit or flexi rods.
Has anyone tried these methods on really short hair (chin length)? I’m eyeing the 30-Pack Flexi Rods Foam Curlers Set but worried the rods are too big for short sections. Also would love tips for keeping curls overnight without them sliding out.
For chin-length hair, smaller flexi rods or tighter twists usually work better. You can also try mini braids or the headband rod kit but use smaller sections. Use a little mousse or styling cream to help the hair hold overnight.
Look for lightweight, flexible-hold mousses. Apply sparingly, evenly distribute, and scrunch. In the morning, use Hair Milk Curl Refresher Spray to bring back softness.
Question for folks with fine hair: should I use the Kitsch Satin 34″ Heatless Curling Rod Set or go for flexi rods? Also, do heavier products weigh my waves down? I’m terrified of limp curls 😬
For fine hair, the Kitsch rod is usually gentler — it gives volume without the bulk of lots of foam rods. Use light-weight mousse or a light curl foam instead of heavy creams. And try the Hair Milk Curl Refresher Spray for morning lift without heaviness.
Satin helps reduce breakage and friction, so it preserves the curl shape better. For volume, use a loose pineapple at night and a quick root shake with fingers in the morning — avoid smoothing at the roots.
I have super fine hair and the Kitsch set was a game-changer. I avoid thick creams; a small amount of mousse before styling + dry shampoo at the roots in the morning keeps volume.
Long post incoming because I actually experimented a ton lol
– Hair: thick, slightly wavy
– Method: tried braids + the 30-Pack Flexi Rods Foam Curlers Set on a few pieces
Results: braids gave me beachy waves but the flexi rods gave me tighter ringlets on the underside. Biggest lesson: prep matters — I used a light leave-in and the Complete Braid & Edge Control Styling Kit on my edges. Also, the Bedsure Satin Pillowcase Set Queen Size Pair helped reduce frizz overnight.
Overall super happy but it took a couple attempts to get the right tension on the rods. Worth it though! 😊
I sleep on my side mostly. I use a loose pineapple or tie a silk scarf before topping with the pillowcase. Keeps shape better than just leaving it loose.
Great experiment, Maya — love the detailed notes. For thick hair, slightly dampening sections (not soaking) can help set the rod shape without long drying time. Also happy you liked the pillowcase; satin really reduces friction.
If anyone wants a quick routine for thick hair: damp, apply light curl cream, section, use flexi rods for underside and braids on top — sleep, then finish with Hair Milk Curl Refresher for bounce.
Not a fan of foam rods — they feel bulky. I prefer twists and buns for looser waves. Anyone else find flexi rods take forever to set? Serious question: morning refresh, should I use a tiny bit of oil or the curl refresher spray?
If you want lightness, use the curl refresher spray first — it reactivates the pattern without adding weight. A teeny drop of oil on the ends can add shine if needed, but avoid roots to keep volume.
Slept with a headband and woke up like I lost a fight with a burrito. But the waves were actually cute. Bedsure pillowcase = 10/10, my face thanked me 😂
Tried the Silk Heatless Curling Rod Headband Overnight Kit last night and woke up with legit waves. Minimal frizz and my hair felt softer than when I heat-styled. Quick tip: braid a loose section after wrapping on the rod for more defined ends.
So glad it worked for you, Ethan! Wrapping the ends with a loose braid is a great trick to avoid the stretched-out tips. If you want more definition, try using the Hair Milk Curl Refresher Spray in the morning — spritz then scrunch.
Woke up to perfect curls… until my dog decided they were chew toys. 😭 Any quick morning fixes for flattened or slightly squashed curls? I used the Complete Braid & Edge Control Styling Kit and the ends were okay but the crown got mashed.
Oh no, dog attacks on coiffure are the worst. Quick fixes: flip your head upside down and shake at the roots, use a tiny spritz of Hair Milk Curl Refresher Spray and scrunch, then finger-twist a few pieces to rebuild definition. If the crown is flat, a little dry shampoo at roots + a quick tousle works wonders.
Just wanted to say: braid + a little edge control = best weekend hair. Used the Complete Braid & Edge Control Styling Kit and it kept my style clean without crunchy residue. Pro tip: sleep with a loose satin scarf over braids and you’ll avoid frizz.
I feel like a human pretzel after trying the headband method 😂 My waves were cute though. Curious how long people let their hair dry before removing — full dry or slightly damp?
If you’re short on time, sleep with it and let it fully dry overnight. If you need to take it out earlier, use a cool blast from a hairdryer to set gently.
Haha pretzel is accurate. For most styles, aim for mostly dry — if it’s too damp you risk collapsing the curl. But a little dampness can help if you want looser waves once they relax.


Love the idea of heatless styling, but worried about costs — kits, pillowcases, multiple tool sets add up. Are there cheap DIY options that still work? I don’t mind a bit of trial-and-error, just don’t want to spend $100+ right away.
Totally get that. DIY options: use an old soft tee as a headband or make DIY silk scrunchies (less friction than cotton). Braids and twists need minimal product. Bedsure pillowcases are nice but you can try a silk scarf first. The only pricier buys I’d recommend if you want convenience are a decent rod kit or flexi rods.
I used a rolled-up tshirt as a headband for months before buying anything — worked surprisingly well!
Great ideas, thanks! Might start cheap and upgrade if I stick with it.
Has anyone tried these methods on really short hair (chin length)? I’m eyeing the 30-Pack Flexi Rods Foam Curlers Set but worried the rods are too big for short sections. Also would love tips for keeping curls overnight without them sliding out.
I have a bob and used small flexi rods on the underside and headband method on top — worked well. Pin the rods with bobby pins if they’re slipping.
For chin-length hair, smaller flexi rods or tighter twists usually work better. You can also try mini braids or the headband rod kit but use smaller sections. Use a little mousse or styling cream to help the hair hold overnight.
Thanks! Pinning is a great idea. Any specific mousse rec you recommend that won’t leave crunch?
Look for lightweight, flexible-hold mousses. Apply sparingly, evenly distribute, and scrunch. In the morning, use Hair Milk Curl Refresher Spray to bring back softness.
Question for folks with fine hair: should I use the Kitsch Satin 34″ Heatless Curling Rod Set or go for flexi rods? Also, do heavier products weigh my waves down? I’m terrified of limp curls 😬
For fine hair, the Kitsch rod is usually gentler — it gives volume without the bulk of lots of foam rods. Use light-weight mousse or a light curl foam instead of heavy creams. And try the Hair Milk Curl Refresher Spray for morning lift without heaviness.
Thanks! Does the Bedsure Satin Pillowcase help with volume? I thought satin would flatten but maybe it’s better than cotton?
Satin helps reduce breakage and friction, so it preserves the curl shape better. For volume, use a loose pineapple at night and a quick root shake with fingers in the morning — avoid smoothing at the roots.
Also try flipping your head forward when you remove — instant lift.
I have super fine hair and the Kitsch set was a game-changer. I avoid thick creams; a small amount of mousse before styling + dry shampoo at the roots in the morning keeps volume.
Long post incoming because I actually experimented a ton lol
– Hair: thick, slightly wavy
– Method: tried braids + the 30-Pack Flexi Rods Foam Curlers Set on a few pieces
Results: braids gave me beachy waves but the flexi rods gave me tighter ringlets on the underside. Biggest lesson: prep matters — I used a light leave-in and the Complete Braid & Edge Control Styling Kit on my edges. Also, the Bedsure Satin Pillowcase Set Queen Size Pair helped reduce frizz overnight.
Overall super happy but it took a couple attempts to get the right tension on the rods. Worth it though! 😊
I sleep on my side mostly. I use a loose pineapple or tie a silk scarf before topping with the pillowcase. Keeps shape better than just leaving it loose.
Great experiment, Maya — love the detailed notes. For thick hair, slightly dampening sections (not soaking) can help set the rod shape without long drying time. Also happy you liked the pillowcase; satin really reduces friction.
If anyone wants a quick routine for thick hair: damp, apply light curl cream, section, use flexi rods for underside and braids on top — sleep, then finish with Hair Milk Curl Refresher for bounce.
Awesome breakdown — do you sleep on your back or side? I’ve been paranoid about flattening my curls lol
Not a fan of foam rods — they feel bulky. I prefer twists and buns for looser waves. Anyone else find flexi rods take forever to set? Serious question: morning refresh, should I use a tiny bit of oil or the curl refresher spray?
Agree — oil only on ends. The spray is a quick savior!
If you want lightness, use the curl refresher spray first — it reactivates the pattern without adding weight. A teeny drop of oil on the ends can add shine if needed, but avoid roots to keep volume.
Slept with a headband and woke up like I lost a fight with a burrito. But the waves were actually cute. Bedsure pillowcase = 10/10, my face thanked me 😂
Burrito mode often equals success, apparently. Glad the pillowcase helped — less friction = fewer messes.
lol omg @Owen same. I call it the ‘sleep burrito’ method now.
Tried the Silk Heatless Curling Rod Headband Overnight Kit last night and woke up with legit waves. Minimal frizz and my hair felt softer than when I heat-styled. Quick tip: braid a loose section after wrapping on the rod for more defined ends.
So glad it worked for you, Ethan! Wrapping the ends with a loose braid is a great trick to avoid the stretched-out tips. If you want more definition, try using the Hair Milk Curl Refresher Spray in the morning — spritz then scrunch.
Thanks @Lena — shoulder-length, used 5-6 sections. I think Kitsch has more length options if you’ve got long hair.
oh nice!! I’ve been debating between the Silk kit and the Kitsch set — how long was your hair and how many rods did you use?
Woke up to perfect curls… until my dog decided they were chew toys. 😭 Any quick morning fixes for flattened or slightly squashed curls? I used the Complete Braid & Edge Control Styling Kit and the ends were okay but the crown got mashed.
Oh no, dog attacks on coiffure are the worst. Quick fixes: flip your head upside down and shake at the roots, use a tiny spritz of Hair Milk Curl Refresher Spray and scrunch, then finger-twist a few pieces to rebuild definition. If the crown is flat, a little dry shampoo at roots + a quick tousle works wonders.
Also, a small curling wand on a low heat for a few seconds on problem pieces can rescue things if you’re in a rush.
Haha been there with pets. I keep an emergency elastic and bobby pins for a cute half-up if the crown won’t cooperate.
Thanks! I’ll try the refresher spray first — hesitant to heat it again but might for a few stubborn spots.
Just wanted to say: braid + a little edge control = best weekend hair. Used the Complete Braid & Edge Control Styling Kit and it kept my style clean without crunchy residue. Pro tip: sleep with a loose satin scarf over braids and you’ll avoid frizz.
Yes! Edge control can make braids look neat while staying soft. Great tip about the satin scarf — doubles down on the pillowcase.
No flakes for me — the formula I used was smooth. But always test a tiny bit first, especially if you have product sensitivity.
Does the kit include a gel that flakes? I’m picky about white residue.
I feel like a human pretzel after trying the headband method 😂 My waves were cute though. Curious how long people let their hair dry before removing — full dry or slightly damp?
If you’re short on time, sleep with it and let it fully dry overnight. If you need to take it out earlier, use a cool blast from a hairdryer to set gently.
Haha pretzel is accurate. For most styles, aim for mostly dry — if it’s too damp you risk collapsing the curl. But a little dampness can help if you want looser waves once they relax.